Popular Posts
-
 For those of you who know how to crochet, I decided to just post the pattern I made for the ear warmers that I make. I hope it is all clea...
 -
 Baby Bow Hat Tutorial I saw a picture of a hat similar to this on Pinterest that was knitted. I don't know how to knit, frankly,...
 -
 Jer and I are just bursting with excitement for our little angel to be born in just a few weeks! I had a maternity shoot a couple months ago...
 -
 Last week I had my second and final baby shower before our munchkin makes his debut. For those of you who are interested I'm 37 weeks 2 ...
 -
 This week I was lucky enough to get together with Phil Van Nostrand a family friend of 18 years (we just figured that out, crazy!) to take s...
Grab a Button!
Showing posts with label Cooking. Show all posts
Showing posts with label Cooking. Show all posts
Thursday, October 17, 2013
Last week I had my second and final baby shower before our munchkin makes his debut. For those of you who are interested I'm 37 weeks 2 days and my doc thinks the baby will be late...thanks doc. Its OK though because once he's out, he's out for good! No going back. :o)
The shower had a "Little Man" theme. My sister organized it with help from several of my lovely friends. Here are some of the details.

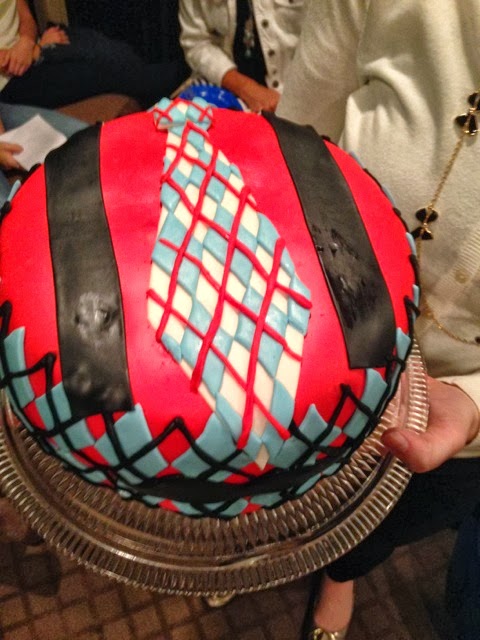
 Beautiful cake made by my sister's friend.
 Manly snacks. Notice the napkins are folded like bow ties.
 Favors. Cute boxes came from Zurchers.
 Mustache photo booth.
 Loved this idea by my friend Court: a fingerprint tree with guests names written on their fingerprint "leaves" to frame or put in the baby book.
 Food was a cookies and milk theme so we had chocolate and regular milk and my sister took mason jars and made bow ties out of scrapbook paper and then my friend got mustache straws. So cute.

 Beautiful fruit.
 Real men eat dessert! Found these print outs on Etsy.
 Lots of fun guests. Sisters!

 Notice the awesome "Little Man" banner made by my sister with paper ties, each decorated differently and strung with twine.

 The drink bar.
For a look at the cute invite my sister got on Etsy go to my sister's blog here.
Stay tuned for posts on some of my recent projects getting ready for baby! Lots of nesting happening over here.
The shower had a "Little Man" theme. My sister organized it with help from several of my lovely friends. Here are some of the details.


Darling mustache cookies made by my MIL.


For a look at the cute invite my sister got on Etsy go to my sister's blog here.
Stay tuned for posts on some of my recent projects getting ready for baby! Lots of nesting happening over here.
Friday, September 13, 2013
Last night, my friend Katie and I had the pleasure of throwing a baby shower for one of our dear friends Brittany. She is due with a girl 4 weeks before me. It was really fun for Katie and I to be able to have fun with all the pink girly stuff since I'm having a boy and Katie just had a boy 2 months ago.
 I spent the day baking the treats for the shower and also the bread for the soup. These three recipes are tried and true pins that I have loved and will continue to use over and over. See this post for the cookie recipe. Here for the Texas Sheet Cake and here for the amazing (and very easy) artisan bread. I swear by these recipes. I would run, not walk to pin these recipes. Winners.
 Katie used the Cricut to make this cute sign. The Cricut is so easy to use and becomes addicting after you figure out how to use it!
 For the food, Katie made tomato basil soup, also a BIG hit, artisan bread, fresh strawberry lemonade, chocolate dipped strawberries and pretzels and the goodies I showed earlier.
 Katie found the idea for the cute puff balls on pinterest here and had the idea to make it into a cute little garland to hang. The best part? We got the tissue at the dollar store and they really didn't take all that long to make.
 More puff balls!
 I was in charge of favors, the best part? All from the dollar store! Katie found some awesome nail polishes ($1 each) and I got the files (4 for $1), Jolly Rancher Pops (whole bag for $1) and bags (pack of 30 for $1) at Honks.
 And here we are with the guest(s) of honor.
Here's my 2 cents about the dollar store...or I guess maybe its at least worth a dollar ;o). Think twice before you buy things at the regular store before you check the dollar store.
I wandered in to Honks on Tuesday to look for some things for the shower and found out that the first Tuesday of every month is 88 cent Tuesday at Honks. As I went down the aisles, I found TONS of painting supplies for a house painting project we had coming up: I got trays, roller covers, tape, drop cloths, brushes, scrapers, masks, school supplies for my sister, shower items including game stuff, tissue paper, bags, favor stuff, cleaning supplies and a few other goodies for only $36! (That's more than 40 items) Can you believe it?!
You would be surprised what you can find at the dollar store and how much money you can save. Sure, I value the opinion that there are some things you just need to pay full-price for, but for a lot of the little things, the dollar store is just the ticket. My two favorites are Honks and Family Dollar.
Thursday, September 12, 2013
Today I'm baking all day for a baby shower, listening to the rain, oh and I ate pie and pumpkin cookies for breakfast. Shhhh don't tell. I have been waiting all summer for fall to come and it finally feels that way! I have been obsessed with peaches my whole pregnancy and I am in prego heaven with them being in season now.
We have had a long, bumpy road house hunting, moving, job changes, etc etc this summer and we have had so much help from loved ones so I decided to bake pies yesterday for those that helped.
 I went a little overboard at Allred Orchards. Its on University Avenue for those of you Utah County-ers and I frequent it from about August through November for all my fruit and veggie needs. You should all check it out. I got apples, nectarines and peaches. (Oh and that box was twice as full before I made the pies.) I'm going to have to come up with some more recipes to use all this fruit!
And now, for one of my new FAVORITE pins. I have a hard time with pies. We all know that about me. But I'm always willing to try again. My mom pinned this Paula Deen frozen peach pie filling recipe and I had to try it.
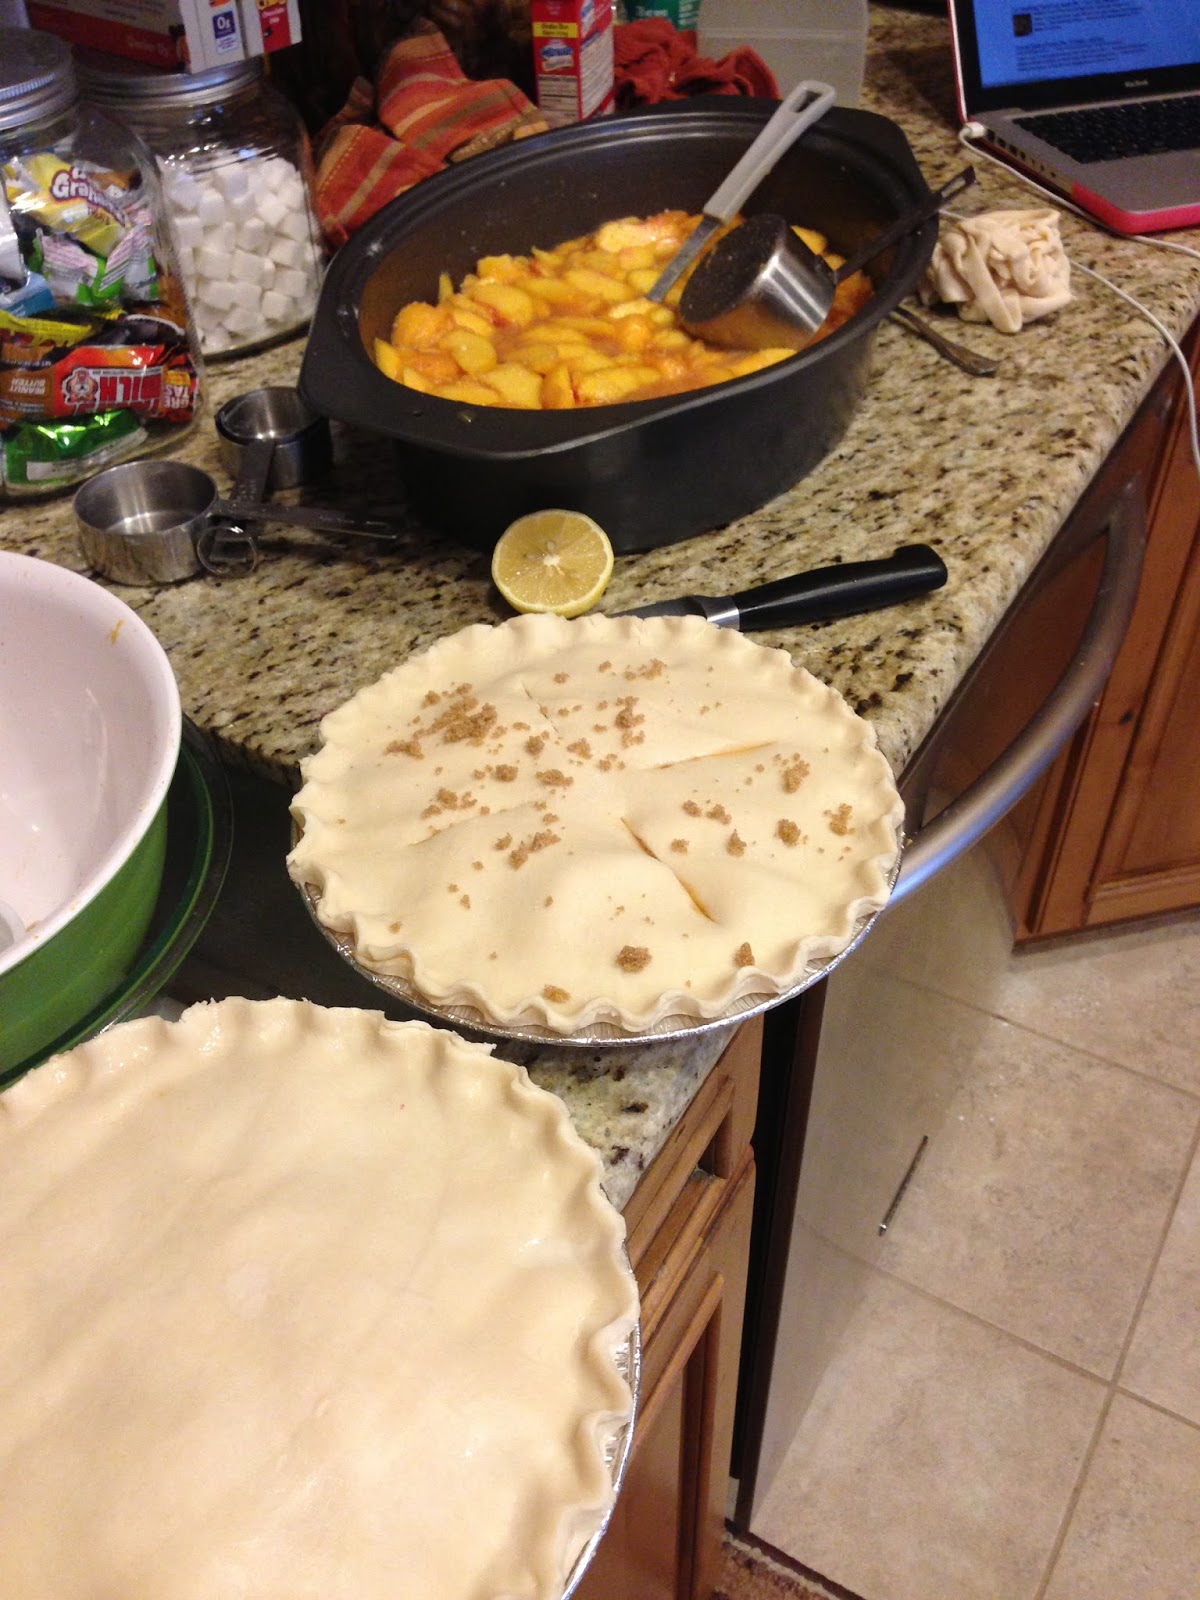
 In the process. (Hint: it makes 6-8 pies worth of filling so plan accordingly, this roast pan was the only thing that would fit all my filling!)
*Please note that a while back I made the decision that I don't do homemade pie crust. I buy the refrigerated kind from the store and it works like a charm, take it from me.
 On the way to deliver! I sprinkled a little brown sugar on top.
The whole process didn't take very long and was nice because I could make a whole bunch at once and on top of that, she give brilliant instructions on how to freeze the filling easily so you can literally throw a pie together at a moment's notice.
When I made it, it made enough filling for about 6 pies (I like to load the filling in.) AND it wasn't watery after it set after baking. I was thrilled.
*I omitted the extra half stick of butter she suggests PER PIE before baking and it still turned out great. I didn't think that was necessary. Especially with me eating it 3 meals a day...;o)
In other news, I've been feeling very inspired as of late with the changing of the seasons and a little more time on my hands now that I'm not working.
 Not only did I get to spend some time with this little one, but she became my model too! haha I made this turban hat for a friend and had to try it on to make sure it fit of course.
 Being twinners with my new best girlfriend.
 Excited to start wearing my infinity scarves and to make lots more. One of my favorite items in my shop!
 And finally! I think all this rain and baking is cause for celebration so I'm having a long weekend sale. From now through Saturday, use code FALL20 at checkout in my Etsy shop and receive 20% off everything in my shop! Now is the time to stock up on your warm fall/winter accessories and get baby gifts galore! (I know lots of people having babies soon, I bet you do too!) There is a link to my shop in the side bar of this blog, go check it out!!
Enjoy!
We have had a long, bumpy road house hunting, moving, job changes, etc etc this summer and we have had so much help from loved ones so I decided to bake pies yesterday for those that helped.

And now, for one of my new FAVORITE pins. I have a hard time with pies. We all know that about me. But I'm always willing to try again. My mom pinned this Paula Deen frozen peach pie filling recipe and I had to try it.
*Please note that a while back I made the decision that I don't do homemade pie crust. I buy the refrigerated kind from the store and it works like a charm, take it from me.

The whole process didn't take very long and was nice because I could make a whole bunch at once and on top of that, she give brilliant instructions on how to freeze the filling easily so you can literally throw a pie together at a moment's notice.
When I made it, it made enough filling for about 6 pies (I like to load the filling in.) AND it wasn't watery after it set after baking. I was thrilled.
*I omitted the extra half stick of butter she suggests PER PIE before baking and it still turned out great. I didn't think that was necessary. Especially with me eating it 3 meals a day...;o)
In other news, I've been feeling very inspired as of late with the changing of the seasons and a little more time on my hands now that I'm not working.


Enjoy!
Sunday, September 8, 2013
My sister got diagnosed with Celiacs Disease a couple years ago and since then, our family has been dabbling a bit in the GF world. I am still struggling a bit to remember that some things (like condensed soups) have gluten in them, but we are all getting better. Katie is turning the big 3-0 on Tuesday and since we have birthing class that evening, we did a dinner and cake for her tonight instead.
 Here she is with my GF semi-homemade creation.
 So, she requested a cake with strawberry filling. I decided to look around, find some ideas and make up my own masterpiece. Here's what I did:
-Bake a BETTY CROCKER gluten free yellow cake mix (Betty Crocker is the best GF mix, according to many sources.) according to directions.
-Let cake cool and slice in half horizontally.
-Cream Cheese icing:
(I have looked high and low for a good cream cheese icing recipe that does not have a gluey or runny consistency, still haven't found it. This pin claimed that it was the best and....it wasn't. Tasted GREAT, but not the consistency I would have liked.)
Calls for:
8 oz cold cream cheese
4 T Butter (softened)
1 T sour cream
2 t vanilla
2 c powdered sugar
(When you figure out the mystery to the runny cream cheese frosting PLEASE let me know!!!)
-For the filling: Mix about 1/2 c cool whip with 1/2 c frosting and 1 cup or more sliced fresh strawberries.
-Place filling on bottom layer, cover with top layer, frost, decorate and EAT! It was easy but still tasted awesome.
 This cake was gooooood. Even those of us who are not gluten intolerant had to have seconds.
If I have learned anything about GF baking, its that more often than not, the mixes work WAY better than trying to do it from scratch and they taste better too!
And on a side note: I have been making a lot of these lately....


-Bake a BETTY CROCKER gluten free yellow cake mix (Betty Crocker is the best GF mix, according to many sources.) according to directions.
-Let cake cool and slice in half horizontally.
-Cream Cheese icing:
(I have looked high and low for a good cream cheese icing recipe that does not have a gluey or runny consistency, still haven't found it. This pin claimed that it was the best and....it wasn't. Tasted GREAT, but not the consistency I would have liked.)
Calls for:
8 oz cold cream cheese
4 T Butter (softened)
1 T sour cream
2 t vanilla
2 c powdered sugar
(When you figure out the mystery to the runny cream cheese frosting PLEASE let me know!!!)
-For the filling: Mix about 1/2 c cool whip with 1/2 c frosting and 1 cup or more sliced fresh strawberries.
-Place filling on bottom layer, cover with top layer, frost, decorate and EAT! It was easy but still tasted awesome.

If I have learned anything about GF baking, its that more often than not, the mixes work WAY better than trying to do it from scratch and they taste better too!
And on a side note: I have been making a lot of these lately....

(Turban Earwarmer)
And would love to give one away sometime this coming week if I can get a few more followers. If you don't follow my blog yet, make sure to do so and I will be posting the giveaway in the next few days! If you don't want to wait and want to get one now, I sell them in my shop here. Only $10! Get 'em while they're hot! (or since its not that hot anymore.....;o))
Saturday, August 31, 2013
I couple weeks ago I was reviewing my pins because I wanted to try something new and came across this title:
"One Hour Cinnamon Rolls"
Um. No.
I did not believe that I could possibly make any type of good cinnamon rolls in that amount of time. So, naturally, I put it to the test.

 I timed myself and I indeed made 24 (12 cinnamon, 12 orange) beautifully puffy and delicious (had many people taste them) rolls, baked and frosted in under an hour.
Click HERE for the link to the recipe. I promise, you won't be disappointed. If you want to find the actual pin, it is pinned under my "beautiful breakfast" board.
"One Hour Cinnamon Rolls"
Um. No.
I did not believe that I could possibly make any type of good cinnamon rolls in that amount of time. So, naturally, I put it to the test.


Click HERE for the link to the recipe. I promise, you won't be disappointed. If you want to find the actual pin, it is pinned under my "beautiful breakfast" board.
Thursday, August 22, 2013
I think we've all pinned things at one point or another and wondered, "Is this too good to be true?" So I have decided to share with you the worth-while pins that I have tried and felt like they really ARE as easy as they say they are. Aaaaaand for those pins that I have tried and felt were a waste of time (there are many) I will just leave out so as not to offend anyone. :o)
This week there are 3 pins that I wish to showcase:
First:

Chewy Chocolate Chunk Cookies

Our Version
The caption on this pin was "The BEST chocolate chip cookie recipe EVER." Naturally, I was skeptical and had to give it a try. They really did turn out nearly as beautiful as the picture and were just as tasty. Very great recipe.

(This is our finished product, couldn't get a picture from the actual tutorial.)
No-Sew Baby Bow Tie Tutorial
This project was super easy and turned out really cute and required no sewing which was actually really nice. We were able to use scraps that we just had on hand. My sister and I wanted to make some fun accessories for my little man that is on the way and this was the perfect, easy activity.
We even thought it would be really fun for a baby shower: have scraps of fabric and glue guns and let guests make their own gift for the baby boy!
*The only thing we adjusted was that we used clip on earrings glued to the back of the ties instead of velcro so you can just clip them on whatever the babe is wearing instead of having to have a specific onesie he wears them with. We just got the clips at Michaels and they worked like a charm.
And finally:
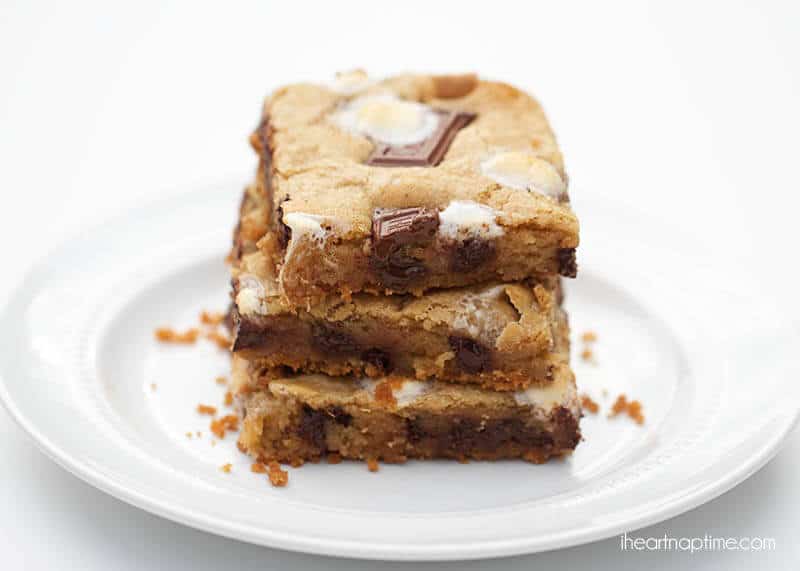
S'Mores Bars
These were easy and yummy and tasted better than s'mores. We didn't have Hershey's bars so we just used chocolate chips and they were still just as good. We halfed the recipe which made the bars a little thicker than in the picture. I think I would probably not half it next time so that the thickness would be correct.
Enjoy! And happy pinning!
This week there are 3 pins that I wish to showcase:
First:
Chewy Chocolate Chunk Cookies
Our Version
The caption on this pin was "The BEST chocolate chip cookie recipe EVER." Naturally, I was skeptical and had to give it a try. They really did turn out nearly as beautiful as the picture and were just as tasty. Very great recipe.
(This is our finished product, couldn't get a picture from the actual tutorial.)
No-Sew Baby Bow Tie Tutorial
This project was super easy and turned out really cute and required no sewing which was actually really nice. We were able to use scraps that we just had on hand. My sister and I wanted to make some fun accessories for my little man that is on the way and this was the perfect, easy activity.
We even thought it would be really fun for a baby shower: have scraps of fabric and glue guns and let guests make their own gift for the baby boy!
*The only thing we adjusted was that we used clip on earrings glued to the back of the ties instead of velcro so you can just clip them on whatever the babe is wearing instead of having to have a specific onesie he wears them with. We just got the clips at Michaels and they worked like a charm.
And finally:
S'Mores Bars
These were easy and yummy and tasted better than s'mores. We didn't have Hershey's bars so we just used chocolate chips and they were still just as good. We halfed the recipe which made the bars a little thicker than in the picture. I think I would probably not half it next time so that the thickness would be correct.
Enjoy! And happy pinning!
Monday, August 19, 2013
I don't know if I've shared this recipe on the blog before but I feel like it merited another go if so.
This is a recipe from my Great Grandma Lytle, her food was second to none. Whenever people asked for her recipes she said, "Oh its just a little of this and a little of that." She was born in 1900 and lived through the depression so I don't doubt that she just made do with what she had most of the time. So we're lucky to have this recipe.
My dad uses this recipe when he cooks dutch oven, but it can easily be made in the oven and it is quite literally the best cobbler I've ever tasted. Maybe one of my favorite things to eat, ever.
Without further ado, I present to you:
Daisy's Deep Dish Pie
Serves 10
Batter:
¼ cup butter
1 cup sugar
Dash salt
1 ½ cups flour
2 tsp baking powder
1 cup milk
Fruit Mixture:
3 cups fruit, any kind (We use canned peaches and reserve the juice.)
2 cups juice from fruit
¼ cup butter, cut in small pieces
Mix batter—pour into 9x13 pan. Put fruit on top of
batter—dot with butter. On stove, heat juice to boiling. Pour hot juice
over fruit. Bake at 350 degrees for approx 1 hour. Serve hot with whipped
cream or ice cream on top.
*Note: If you use fresh peaches, reduce your juice by at least 1/2 cup. I just make a syrup with sugar and water and bring it to a boil on the stove for the "juice".
*Note: If you use fresh peaches, reduce your juice by at least 1/2 cup. I just make a syrup with sugar and water and bring it to a boil on the stove for the "juice".
It seems like this time of summer, zucchini and summer squash are just multiplying and blossoming everywhere you look! I thought it might be helpful for me to share a few of my favorite zucchini recipes for you to try.
My very favorite cookbooks are the Our Best Bites cookbooks. They have two awesome cookbooks and literally everything I have tried, I have liked. They have a unique spin on zucchini bread which is DELISH:

Go here for the recipe. It makes two loaves and it gets gobbled up fast! So be advised. The prior link takes you to their blog where you can find lots of their delicious recipes.

Ingredients:
Yellow summer squash
Zucchini
Mushrooms
Onions (if desired)
Olive Oil
Seasoned Salt
Heat up a pan with a drizzle of oil in it while you thinly slice first 4 ingredients. Throw in the pan and season to taste. Allow to saute until veggies are tender. The volume will decrease significantly as it cooks so plan accordingly.

My very favorite cookbooks are the Our Best Bites cookbooks. They have two awesome cookbooks and literally everything I have tried, I have liked. They have a unique spin on zucchini bread which is DELISH:
Chocolate Zucchini Bread:
Go here for the recipe. It makes two loaves and it gets gobbled up fast! So be advised. The prior link takes you to their blog where you can find lots of their delicious recipes.
Dad's Zucchini and Squash Saute:
This is simple but a perfect side dish for any meal. My dad would make this for us all the time as kids when we had a big garden and it was one of my favorites.
Ingredients:
Yellow summer squash
Zucchini
Mushrooms
Onions (if desired)
Olive Oil
Seasoned Salt
Heat up a pan with a drizzle of oil in it while you thinly slice first 4 ingredients. Throw in the pan and season to taste. Allow to saute until veggies are tender. The volume will decrease significantly as it cooks so plan accordingly.
Zucchini Quiche:
My sister, SIL and niece are all gluten intolerant and so my mom wanted to find some good recipes that they could eat. This recipe is gluten free and is delicious. My mom has made it several times for adoring fans. What I love about this one, is that its not "weird" gluten-free, it pretty much just happens to not have gluten in it, you don't have to try too hard with this one.
Enjoy the rest of your summer!
Subscribe to:
Posts
(Atom)