Popular Posts
-
 For those of you who know how to crochet, I decided to just post the pattern I made for the ear warmers that I make. I hope it is all clea...
 -
 Baby Bow Hat Tutorial I saw a picture of a hat similar to this on Pinterest that was knitted. I don't know how to knit, frankly,...
 -
 Jer and I are just bursting with excitement for our little angel to be born in just a few weeks! I had a maternity shoot a couple months ago...
 -
 Last week I had my second and final baby shower before our munchkin makes his debut. For those of you who are interested I'm 37 weeks 2 ...
 -
 This week I was lucky enough to get together with Phil Van Nostrand a family friend of 18 years (we just figured that out, crazy!) to take s...
Grab a Button!
Showing posts with label Crafting. Show all posts
Showing posts with label Crafting. Show all posts
Monday, February 17, 2014
I'm baaaaack! (Hopefully). Since having the baby and buying a house, it hasn't left much time for blogging, however, I'm finding myself doing lots of fun projects for the house since we are completely remodeling it and I thought I'd share.
I wanted to make a mobile for my little guy's crib and found a bunch of cute ideas on Pinterest that I decided to put together into my own version. I had a lot of the materials already so this was super cheap and actually pretty easy, just time-consuming. My two sisters helped me and we rotated baby duty while working on it so we could finish it in a couple hours.
Step One:

Take a round, wooden cross-stitching holder and tie strips of fabric around it to cover. You can make the strips as long and wide as you want. Mine were about 1 in. thick and about 6 in. long. I just used scraps I had from his bedding.

Step 2:

We found some images online of elephants that we could copy and trace onto felt. We cut through two layers of felt for the front and back. We made 4 elephants (8 sides total) and 4 sets of ears (8 total).
Step 3:

I took yarn and hand stitched the two sides of the elephant together leaving a hole for stuffing.

I stuffed them with cotton balls but you could use batting or whatever you have around. I cut a smaller version of the ears from the fabric scraps and tacked those on. I actually ended up tacking them on in an "x" which turned out cuter.
Step 4:

I also cut out little stars from different colors of felt. We then threaded each piece with white thread. You could use fishing line, twine, or whatever you have on hand. I like the thread because it is almost invisible but it won't curl. I ended up doing 4 elephants and just a bunch of stars. I made the elephants the same length and the stars different lengths and just tied them from the wooden circle.
Step 5:

In order to hang it from the ceiling, we tied wide ribbon from 4 spots on the mobile base and brought them together at the top. You could also you tulle or fabric. I haven't hung mine since the nursery isn't quite finished but you could tie a bow or a knot and hang it from a hook from the ceiling.
Step 6:

Enjoy! My little man seriously loves this thing! Can't wait to have it over his bed! I think it will make for lots of quiet time entertainment.
Thursday, October 17, 2013
Last week I had my second and final baby shower before our munchkin makes his debut. For those of you who are interested I'm 37 weeks 2 days and my doc thinks the baby will be late...thanks doc. Its OK though because once he's out, he's out for good! No going back. :o)
The shower had a "Little Man" theme. My sister organized it with help from several of my lovely friends. Here are some of the details.

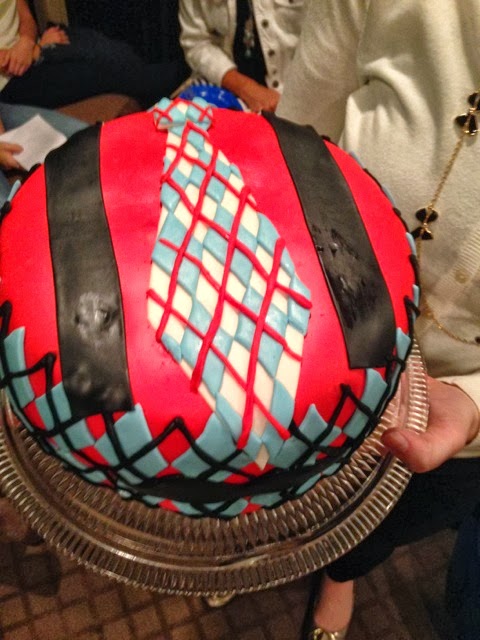
 Beautiful cake made by my sister's friend.
 Manly snacks. Notice the napkins are folded like bow ties.
 Favors. Cute boxes came from Zurchers.
 Mustache photo booth.
 Loved this idea by my friend Court: a fingerprint tree with guests names written on their fingerprint "leaves" to frame or put in the baby book.
 Food was a cookies and milk theme so we had chocolate and regular milk and my sister took mason jars and made bow ties out of scrapbook paper and then my friend got mustache straws. So cute.

 Beautiful fruit.
 Real men eat dessert! Found these print outs on Etsy.
 Lots of fun guests. Sisters!

 Notice the awesome "Little Man" banner made by my sister with paper ties, each decorated differently and strung with twine.

 The drink bar.
For a look at the cute invite my sister got on Etsy go to my sister's blog here.
Stay tuned for posts on some of my recent projects getting ready for baby! Lots of nesting happening over here.
The shower had a "Little Man" theme. My sister organized it with help from several of my lovely friends. Here are some of the details.


Darling mustache cookies made by my MIL.


For a look at the cute invite my sister got on Etsy go to my sister's blog here.
Stay tuned for posts on some of my recent projects getting ready for baby! Lots of nesting happening over here.
Friday, September 13, 2013
Last night, my friend Katie and I had the pleasure of throwing a baby shower for one of our dear friends Brittany. She is due with a girl 4 weeks before me. It was really fun for Katie and I to be able to have fun with all the pink girly stuff since I'm having a boy and Katie just had a boy 2 months ago.
 I spent the day baking the treats for the shower and also the bread for the soup. These three recipes are tried and true pins that I have loved and will continue to use over and over. See this post for the cookie recipe. Here for the Texas Sheet Cake and here for the amazing (and very easy) artisan bread. I swear by these recipes. I would run, not walk to pin these recipes. Winners.
 Katie used the Cricut to make this cute sign. The Cricut is so easy to use and becomes addicting after you figure out how to use it!
 For the food, Katie made tomato basil soup, also a BIG hit, artisan bread, fresh strawberry lemonade, chocolate dipped strawberries and pretzels and the goodies I showed earlier.
 Katie found the idea for the cute puff balls on pinterest here and had the idea to make it into a cute little garland to hang. The best part? We got the tissue at the dollar store and they really didn't take all that long to make.
 More puff balls!
 I was in charge of favors, the best part? All from the dollar store! Katie found some awesome nail polishes ($1 each) and I got the files (4 for $1), Jolly Rancher Pops (whole bag for $1) and bags (pack of 30 for $1) at Honks.
 And here we are with the guest(s) of honor.
Here's my 2 cents about the dollar store...or I guess maybe its at least worth a dollar ;o). Think twice before you buy things at the regular store before you check the dollar store.
I wandered in to Honks on Tuesday to look for some things for the shower and found out that the first Tuesday of every month is 88 cent Tuesday at Honks. As I went down the aisles, I found TONS of painting supplies for a house painting project we had coming up: I got trays, roller covers, tape, drop cloths, brushes, scrapers, masks, school supplies for my sister, shower items including game stuff, tissue paper, bags, favor stuff, cleaning supplies and a few other goodies for only $36! (That's more than 40 items) Can you believe it?!
You would be surprised what you can find at the dollar store and how much money you can save. Sure, I value the opinion that there are some things you just need to pay full-price for, but for a lot of the little things, the dollar store is just the ticket. My two favorites are Honks and Family Dollar.
Monday, August 19, 2013
I posted this during Christmas of 2012 and thought it would be fun to post on my craft blog!
My two friends in my ward and I got have been planning for a couple weeks now to do some long-overdue crafting. When we were finally done with finals we hit JoAnn's and crafted for a whole weekend pretty much.
 Here we are working on various crafts at Courtney's table. I fear we invaded her house with hot glue and fabric, poor Eric.
 This
is the wreath we made. Isn't it cute!? We bought various colors and
patterns of fabric, a wire wreath frame, cut the fabric into strips and
tied the strips onto the frame. I'm so excited to hang this next season~
This
is the wreath we made. Isn't it cute!? We bought various colors and
patterns of fabric, a wire wreath frame, cut the fabric into strips and
tied the strips onto the frame. I'm so excited to hang this next season~
 We
got some cute mini ornaments and glued them together into trees and
then tied some bows and glued them on. Court and Alison made three each
and I plan to make one more that is a little bigger. Another craft that
is still in the making are our blocks that we will be spelling santa
with a decorating with paper and embellishments. We had quite the
adventure at home depot getting the blocks cut! But we did it and were
very proud of ourselves. I think one of our most proud moments was
finding that we had saved $66.00 at JoAnn's and only spent $21.00 each
for all of our darling crafts!
We
got some cute mini ornaments and glued them together into trees and
then tied some bows and glued them on. Court and Alison made three each
and I plan to make one more that is a little bigger. Another craft that
is still in the making are our blocks that we will be spelling santa
with a decorating with paper and embellishments. We had quite the
adventure at home depot getting the blocks cut! But we did it and were
very proud of ourselves. I think one of our most proud moments was
finding that we had saved $66.00 at JoAnn's and only spent $21.00 each
for all of our darling crafts!
My two friends in my ward and I got have been planning for a couple weeks now to do some long-overdue crafting. When we were finally done with finals we hit JoAnn's and crafted for a whole weekend pretty much.


Subscribe to:
Posts
(Atom)