Popular Posts
-
 For those of you who know how to crochet, I decided to just post the pattern I made for the ear warmers that I make. I hope it is all clea...
 -
 Baby Bow Hat Tutorial I saw a picture of a hat similar to this on Pinterest that was knitted. I don't know how to knit, frankly,...
 -
 Jer and I are just bursting with excitement for our little angel to be born in just a few weeks! I had a maternity shoot a couple months ago...
 -
 Last week I had my second and final baby shower before our munchkin makes his debut. For those of you who are interested I'm 37 weeks 2 ...
 -
 This week I was lucky enough to get together with Phil Van Nostrand a family friend of 18 years (we just figured that out, crazy!) to take s...
Grab a Button!

Showing posts with label Crocheting. Show all posts
Showing posts with label Crocheting. Show all posts
Thursday, September 12, 2013
Today I'm baking all day for a baby shower, listening to the rain, oh and I ate pie and pumpkin cookies for breakfast. Shhhh don't tell. I have been waiting all summer for fall to come and it finally feels that way! I have been obsessed with peaches my whole pregnancy and I am in prego heaven with them being in season now.
We have had a long, bumpy road house hunting, moving, job changes, etc etc this summer and we have had so much help from loved ones so I decided to bake pies yesterday for those that helped.
 I went a little overboard at Allred Orchards. Its on University Avenue for those of you Utah County-ers and I frequent it from about August through November for all my fruit and veggie needs. You should all check it out. I got apples, nectarines and peaches. (Oh and that box was twice as full before I made the pies.) I'm going to have to come up with some more recipes to use all this fruit!
And now, for one of my new FAVORITE pins. I have a hard time with pies. We all know that about me. But I'm always willing to try again. My mom pinned this Paula Deen frozen peach pie filling recipe and I had to try it.
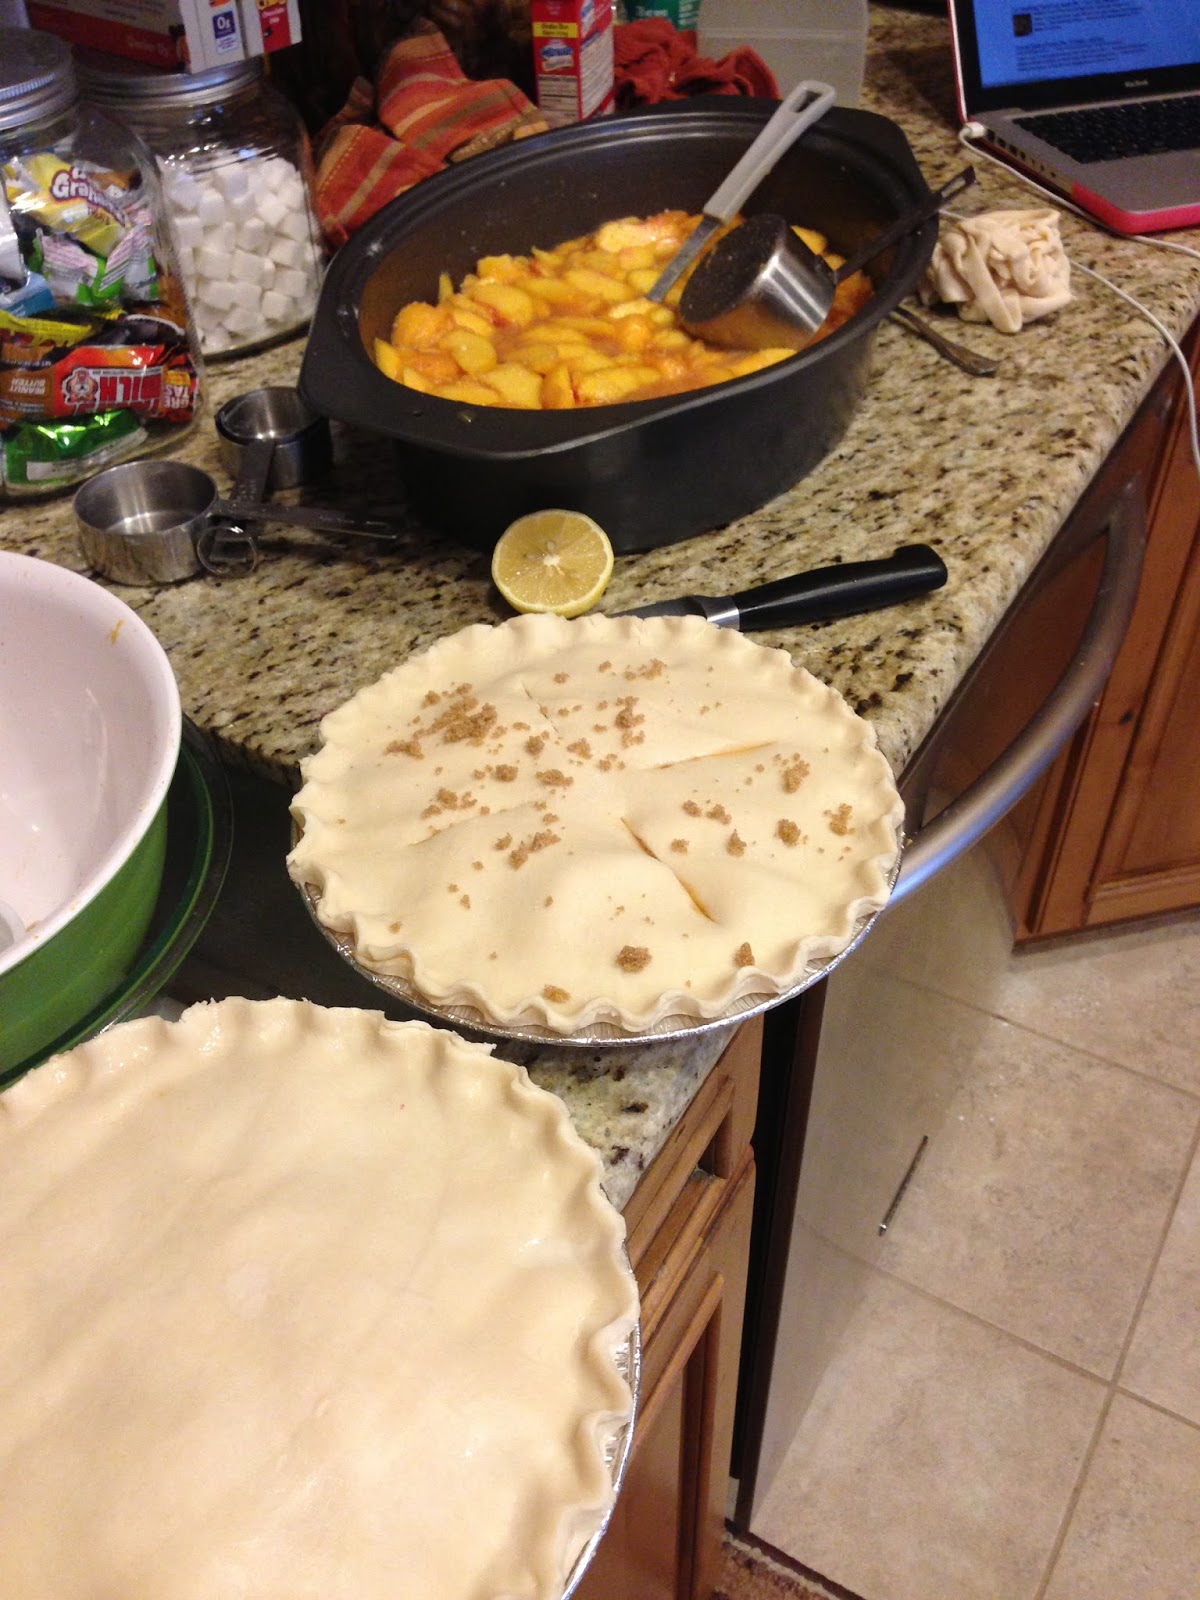
 In the process. (Hint: it makes 6-8 pies worth of filling so plan accordingly, this roast pan was the only thing that would fit all my filling!)
*Please note that a while back I made the decision that I don't do homemade pie crust. I buy the refrigerated kind from the store and it works like a charm, take it from me.
 On the way to deliver! I sprinkled a little brown sugar on top.
The whole process didn't take very long and was nice because I could make a whole bunch at once and on top of that, she give brilliant instructions on how to freeze the filling easily so you can literally throw a pie together at a moment's notice.
When I made it, it made enough filling for about 6 pies (I like to load the filling in.) AND it wasn't watery after it set after baking. I was thrilled.
*I omitted the extra half stick of butter she suggests PER PIE before baking and it still turned out great. I didn't think that was necessary. Especially with me eating it 3 meals a day...;o)
In other news, I've been feeling very inspired as of late with the changing of the seasons and a little more time on my hands now that I'm not working.
 Not only did I get to spend some time with this little one, but she became my model too! haha I made this turban hat for a friend and had to try it on to make sure it fit of course.
 Being twinners with my new best girlfriend.
 Excited to start wearing my infinity scarves and to make lots more. One of my favorite items in my shop!
 And finally! I think all this rain and baking is cause for celebration so I'm having a long weekend sale. From now through Saturday, use code FALL20 at checkout in my Etsy shop and receive 20% off everything in my shop! Now is the time to stock up on your warm fall/winter accessories and get baby gifts galore! (I know lots of people having babies soon, I bet you do too!) There is a link to my shop in the side bar of this blog, go check it out!!
Enjoy!
We have had a long, bumpy road house hunting, moving, job changes, etc etc this summer and we have had so much help from loved ones so I decided to bake pies yesterday for those that helped.

And now, for one of my new FAVORITE pins. I have a hard time with pies. We all know that about me. But I'm always willing to try again. My mom pinned this Paula Deen frozen peach pie filling recipe and I had to try it.
*Please note that a while back I made the decision that I don't do homemade pie crust. I buy the refrigerated kind from the store and it works like a charm, take it from me.

The whole process didn't take very long and was nice because I could make a whole bunch at once and on top of that, she give brilliant instructions on how to freeze the filling easily so you can literally throw a pie together at a moment's notice.
When I made it, it made enough filling for about 6 pies (I like to load the filling in.) AND it wasn't watery after it set after baking. I was thrilled.
*I omitted the extra half stick of butter she suggests PER PIE before baking and it still turned out great. I didn't think that was necessary. Especially with me eating it 3 meals a day...;o)
In other news, I've been feeling very inspired as of late with the changing of the seasons and a little more time on my hands now that I'm not working.


Enjoy!
Sunday, September 8, 2013
My sister got diagnosed with Celiacs Disease a couple years ago and since then, our family has been dabbling a bit in the GF world. I am still struggling a bit to remember that some things (like condensed soups) have gluten in them, but we are all getting better. Katie is turning the big 3-0 on Tuesday and since we have birthing class that evening, we did a dinner and cake for her tonight instead.
 Here she is with my GF semi-homemade creation.
 So, she requested a cake with strawberry filling. I decided to look around, find some ideas and make up my own masterpiece. Here's what I did:
-Bake a BETTY CROCKER gluten free yellow cake mix (Betty Crocker is the best GF mix, according to many sources.) according to directions.
-Let cake cool and slice in half horizontally.
-Cream Cheese icing:
(I have looked high and low for a good cream cheese icing recipe that does not have a gluey or runny consistency, still haven't found it. This pin claimed that it was the best and....it wasn't. Tasted GREAT, but not the consistency I would have liked.)
Calls for:
8 oz cold cream cheese
4 T Butter (softened)
1 T sour cream
2 t vanilla
2 c powdered sugar
(When you figure out the mystery to the runny cream cheese frosting PLEASE let me know!!!)
-For the filling: Mix about 1/2 c cool whip with 1/2 c frosting and 1 cup or more sliced fresh strawberries.
-Place filling on bottom layer, cover with top layer, frost, decorate and EAT! It was easy but still tasted awesome.
 This cake was gooooood. Even those of us who are not gluten intolerant had to have seconds.
If I have learned anything about GF baking, its that more often than not, the mixes work WAY better than trying to do it from scratch and they taste better too!
And on a side note: I have been making a lot of these lately....


-Bake a BETTY CROCKER gluten free yellow cake mix (Betty Crocker is the best GF mix, according to many sources.) according to directions.
-Let cake cool and slice in half horizontally.
-Cream Cheese icing:
(I have looked high and low for a good cream cheese icing recipe that does not have a gluey or runny consistency, still haven't found it. This pin claimed that it was the best and....it wasn't. Tasted GREAT, but not the consistency I would have liked.)
Calls for:
8 oz cold cream cheese
4 T Butter (softened)
1 T sour cream
2 t vanilla
2 c powdered sugar
(When you figure out the mystery to the runny cream cheese frosting PLEASE let me know!!!)
-For the filling: Mix about 1/2 c cool whip with 1/2 c frosting and 1 cup or more sliced fresh strawberries.
-Place filling on bottom layer, cover with top layer, frost, decorate and EAT! It was easy but still tasted awesome.

If I have learned anything about GF baking, its that more often than not, the mixes work WAY better than trying to do it from scratch and they taste better too!
And on a side note: I have been making a lot of these lately....

(Turban Earwarmer)
And would love to give one away sometime this coming week if I can get a few more followers. If you don't follow my blog yet, make sure to do so and I will be posting the giveaway in the next few days! If you don't want to wait and want to get one now, I sell them in my shop here. Only $10! Get 'em while they're hot! (or since its not that hot anymore.....;o))
Monday, August 19, 2013

Baby Bow Hat Tutorial
I saw a picture of a hat similar to this on Pinterest that was knitted. I don't know how to knit, frankly, it confuses me. But I HAD to make this hat, so I decided to make up a pattern for it and thought i'd share. Enjoy!
Materials"
Med-weight yarn in two colors of choice. (I used "Vanna's Choice")
4.25 mm hook or size "G"
Yarn Needle
(This makes a size 6 mos.)
Start with a magic circle
Row 1: Ch 1, 9 sc in magic circle and join with a sl st
Work in back loops for next 7 rows.
Row2: Ch 3, dbl in same st, 2dbl in BACK LOOPS of each sc around, join with a sl st in 3rd ch.
Row 3: Ch 3, dbl in same st,* dbl in next st, 2 dbl in next st* repeat from * all the way around, join with sl st.
Row 4: Ch 3, dbl in same st, *dbl in next 2 st, 2 dbl in next st* repeat from * all the way around, join with sl st.
Row 5: Ch 3, dbl in same st, *dbl in next 3 st, 2 dbl in next st* repeat from * all the way around, join with sl st.
Rows 6-7: Ch3, dbl in same st and each stitch around, join with sl st. Tie off after row 7.
CHANGE COLORS
Row 8: Join new color with sl st. (Still working in back loops) Ch 3, dbl in same st and each st around. Join with a sl st.
Row 9: Work in BOTH loops, Ch 3, dbl in same st and each st around. Join with sl st. Tie off.
CHANGE BACK TO FIRST COLOR
Rows 10-12: Join new color with sl st, ch 1 and sc in ea st around. Join with sl st. Tie off after row 12.
For the Bow:
Row 1: Ch 24, join with sl st to make a circle.
Rows 2-6: Ch1, sc in each stitch around, join with sl st. Tie off.
Lay the circle flat so there are two layers on top of one another. Pinch right in the middle and tie a piece of yarn around pinched off section and tie a knot. Wrap yarn around 5-6 times and tie off in the back.
Take your yarn needle and sew the bow to the second color "band" on the hat making sure it lays flat. I like to only sew the back layer of the bow so it still has some shape. And voila! You have a darling winter hat for your baby.
Enjoy! :o)

I created this scarf pattern the other day and actually really like it. I hope you all enjoy it and can use it!
If you want to see some of the other things I make and sell you can go to www.etsy.com/shop/flowersnfrills I plan on starting to sell more involved patterns later.
Alright, to start with, I use a size K hook or 6.5 mm. As for yarn, you can really use whichever brand and material you like but I prefer Vanna's choice or Loops and Threads Impeccable yarns, they are softer and you can usually get them on sale, however, they ARE acrylic and not wool. Your choice. But I would go with a 3-4 weight for scarves. I used a medium 4 weight for this particular one. You will need two contrasting colors.
Abbreviations:
ch: chain
hd: half-double crochet
sl: slip stitch
sc: single crochet
Here is the pattern. It is pretty simple:
ch 21 (or however wide you want your scarf)
Row 1: turn hd in third ch from hook and hd in each stitch across.
Row 2-10: ch 2, turn, hd in next stitch and each stitch across. Tie off
Row 11: With NEW color. Sl in first stitch, ch 2, hd in same stitch and each stitch across.
Row 12-13: ch 2, turn, hd in next stitch and each stitch across. Tie off.
Repeat rows 2-13 until you have 10 thin stripes and 11 wide stripes.
For edging:
starting at top right corner, sl stitch, ch 1, sc in same stitch and each stitch around entire scarf. (Make sure you only have as many sc as you do rows on the scarf. Don't get confused when you go down the sides. For example down the wide stripe you will have 10 sc and down the thin you will have 3.) Once you get back to where you started, sl in first sc and tie off.
Note: You will have a lot of tails since you tie off with each color change. I would recommend trying to work your tails in as you crochet rather than weaving them in later, it makes for a cleaner looking scarf and less work for you later.
To learn how to do each of these stitches, you can Youtube how-to videos and they are actually pretty easy to follow.
If you end up making this scarf I would love to hear some feedback on the ease or difficulty of the pattern and maybe even see some pictures of your end results!
For
those of you who know how to crochet, I decided to just post the
pattern I made for the ear warmers that I make. I hope it is all clear
and easy to follow. Let me know if you have any questions.
If you don't know how to crochet, I would suggest looking up some videos on Youtube on how to do specific stitches, i.e. slip stitch etc. If you haven't figured it out already, you can teach yourself how to do a lot of things on Youtube!


If you don't know how to crochet, I would suggest looking up some videos on Youtube on how to do specific stitches, i.e. slip stitch etc. If you haven't figured it out already, you can teach yourself how to do a lot of things on Youtube!
Crocheted Bow or Turban Ear Warmer

Crochet
Level: Beginner
Level: Beginner
Materials Needed: Size H hook, medium weight yarn in color of choice, 2 buttons.
Abbreviations: ch- chain, hdc- half-double crochet, sl- slip stitch, yo- yarn over, st- stitch
Half-Double Crochet Directions: yo, insert hook into next st, yo, pull hook through st, yo, pull hook through all 3 loops.
For Headband:
Row 1: ch 62 (more or less depending on size of head, this will fit an average adult head.)
Row 2: hdc in 3rd ch from hook (the skipped ch will act as 1st hdc), hdc in every ch across, after last hdc ch 2, turn.
Row 3: hdc in first st from hook and each st across, ch 2, turn.
Rows 4-10: Repeat row 3.
When finished, tie off, weave in ends, and sew two buttons into one end like so:
I
use yarn and a tapestry needle. Holes in the opposite side can serve as
the button holes. No need to create button holes! Behold, the beauty of
crochet!
Hint:
when tying buttons off, make sure both ends are at the back of your
work and tie the two ends together in a double know. This will ensure
that the buttons will stay on!
For Bow:
This will be done in-the-round. No turning your work.
Row 1: ch 33, join with sl, ch 2.
Row 2: hdc in next st and each st around, join with sl, ch 2.
Rows 3-8: repeat row 2.
When finished, tie off and weave in ends. You should have a tube like so:
Flatten the tube and lay on the headband at desired spot. (Should be offset.) Pinch bow and headband together.
Cut
off a piece of yarn about 2 ft long and tie the two pieces together.
take one end and wrap about 5-6 times. Wrap the other end 5-6 times the
opposite direction. Tie off and tuck ends in the back. It should look
like this:
For Turban:
Make
headband portion the same, skip the bow step and pinch the headband in
the center (exactly between the two ends) and wrap the yarn around the
pinched portion just like you would for the bow. It should look like
this:
Have
fun! And if you don't know how to crochet but love these headbands,
feel free to visit my etsy shop and order one! (Link is on my right-hand
side bar.)
*I
provide this tutorial for your own use and not for you to make a profit
off of the pattern I have created. Please adhere to this request.
Subscribe to:
Posts
(Atom)